How To Create A Template In Word
If you routinely generate a particular type of documents, such as a monthly report, a sales forecast, or a presentation with your company logo, save it as a template so you can reuse it rather than generating the file from scratch each time you need it. Begin using a document you've already created, a document you've downloaded, or a newly customized Microsoft template. Here are the steps on how to create a template in Wordthat can help you with your everyday tasks and decrease the amount of time you spend doing it.
How Do I Create A Custom Template In Word?
Custom Template in Word: Microsoft Word Tutorial (2026)
A template functions similarly to a mold for Word documents; it contains formatting options and document properties that you may reuse whenever you create new documents. If you find yourself applying and producing the same characteristics, features, or content each time you create a new document, building a template can save you time.
Use A Template For Documents

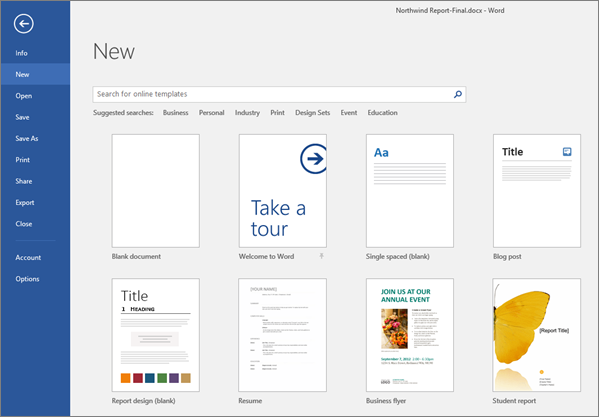
- Click the File tab.
- To begin, select New.
On the New screen, a few Featured templates will be displayed.
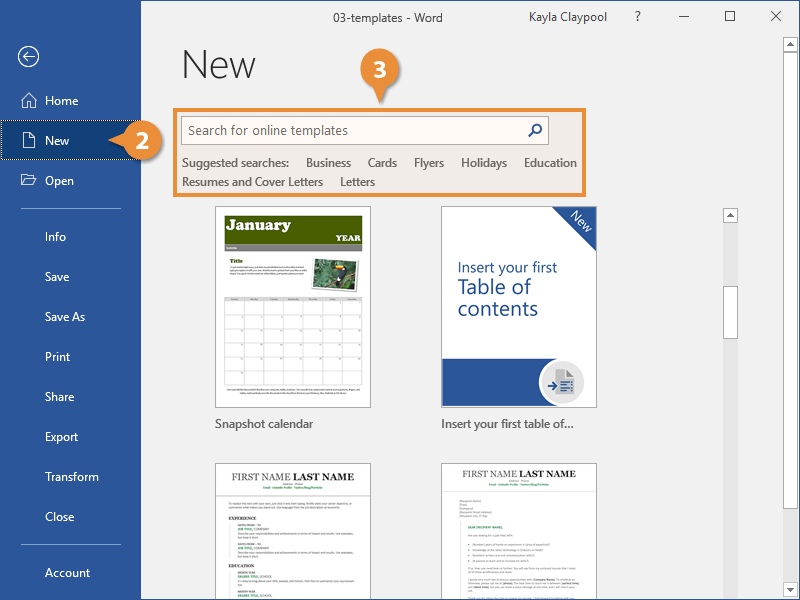
- Look for a template by searching or browsing.
You can use the search field to find more templates, or pick one of the suggested searches to start browsing templates.
A Personal header will appear next to Featured if you've built or installed any custom templates. Any custom templates you've created or added will appear when you click the Personal heading.
A list of categories will appear on the right after you begin looking for templates. You can filter down the templates that show by selecting categories from this list.
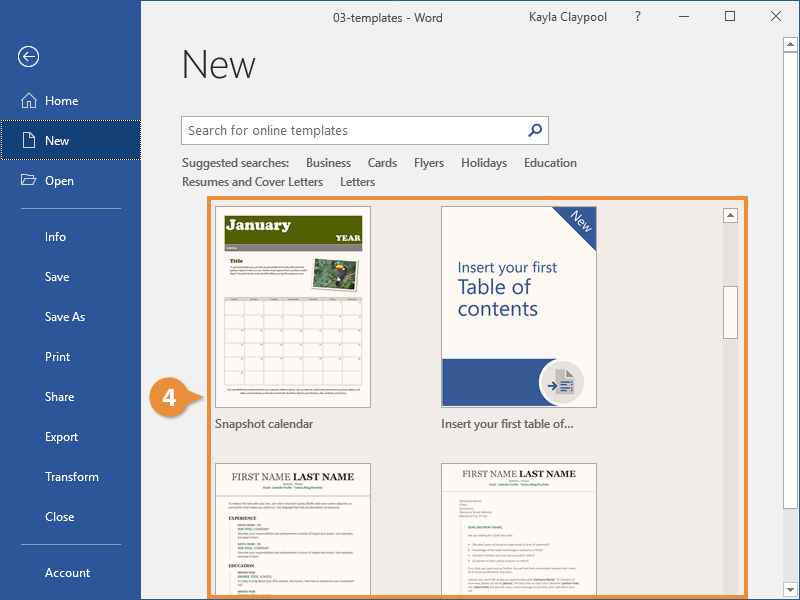
- Choose a design template.
A pop-up window appears, containing additional information on the template that was selected. There is a description, a thumbnail, and the name of the publisher displayed on the screen.
For online templates, the size of the download will also be displayed.
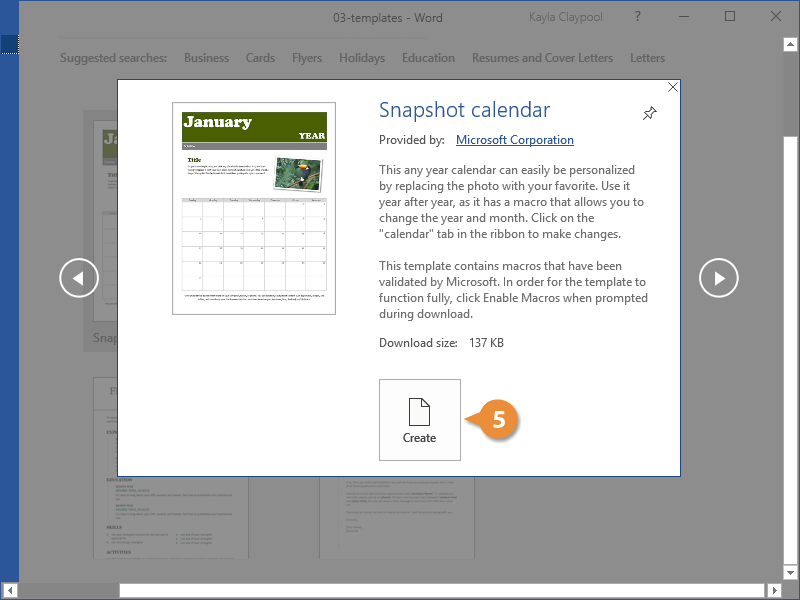
- Click the Create button.
A new document is created using the template that has been downloaded.
Certain layouts may require you to enter additional information, such as the month and year of a calendar. In this situation, a dialog box will open, requesting that you enter the required information.
Make A Document Template
It is possible to save time by making your own template if a built-in template does not work for you and you find yourself applying and altering the same settings, features, or content on a regular basis when you create a new document.
- After you've opened or created the document you wish to use as a template, go to the File tab and select Save As.
Keep in mind that everything that occurs in the document will also appear in the template and vice versa.
In the event that you have included macros or building blocks or styles, they will be included in the template as well.
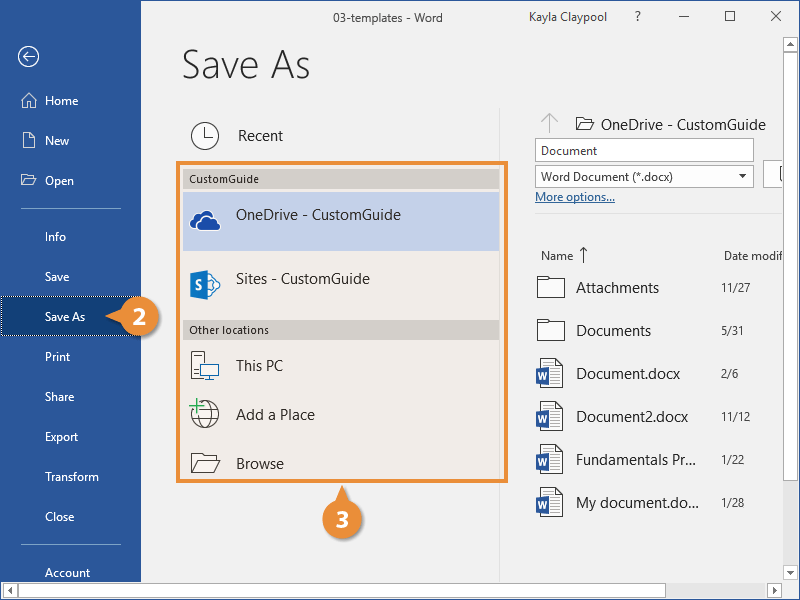
- Click Save As.
- Select a location.
A template can be saved to your PC, your personal OneDrive, a shared SharePoint site, or a shared OneDrive location.

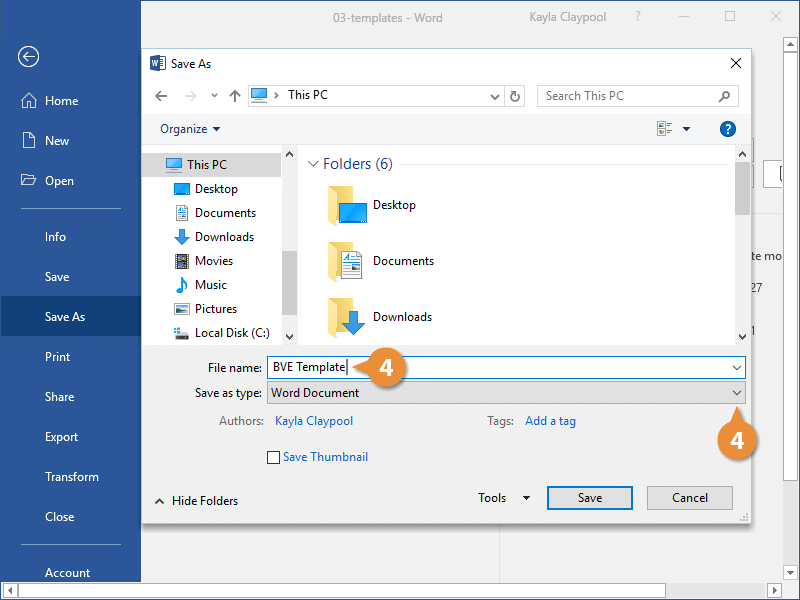
- Click the Save As Type list arrow and give the file a name.
- Choose Word Template from the drop-down menu.
The Templates folder is automatically created if you save it locally on your computer, as described above. Choosing to save to the Templates folder will help you discover the template in the New Document menu more quickly, but you can choose a different location if that is more convenient for you.
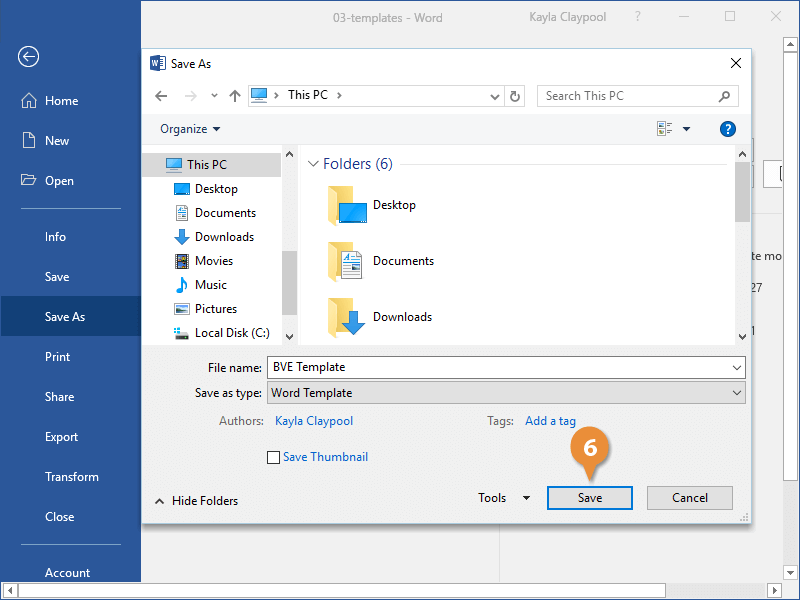
- Save the file.
The.dotx file extension is used to save the template. A copy of the template is made each time it is used to build a new document, ensuring that it is never overwritten.
Customize A Template
It's just as simple to use a custom template as it is to use a built-in template once you've produced one. You'll need to access the template itself if you want to make modifications to the one you've created.
- Click the File tab.
- Click Open.
- Click Browse.
- Go to Documents / Custom Office Templates.
Any custom templates you've generated or uploaded will be stored in this folder by default.
- Choose a design template.
- Click the Open button.
This method of opening a template enables you to modify the template itself. Any modifications you make now will be mirrored in future uses of the template.
How Do I Create A Repeating Template In Word?
From a single template, you can generate a series of customized papers based on responses to a repeated dialog. For instance, if you want to send a letter to five persons, you can collect their names and addresses in a repeating dialog and generate five identical letters, each with a unique name and address.
You can use one of the numerous approaches to repeat a text template (produce multiple versions of the same document), depending on your situation and demands. Each of these ways creates a single word processor file with a page break separating each version of the content.
The first way is to select the complete template text and insert it into a REPEAT instruction. This method works in the majority of cases. The variables from the repeated dialog are then used in the template, and for each iteration, a unique answer is merged into the page. However, if your template contains further REPEAT instructions, you will almost certainly experience issues when assembling a document if one of the corresponding repeated dialogs is not put into the other. In this situation, you can repeat a text template using one of the other two approaches.
The second solution, which likewise employs a REPEAT instruction to repeat the full template text, offers a mechanism for avoiding the issues associated with nesting REPEAT instructions. Prior to repeating the full template, each instance of repeated data in the template is replaced with a temporary Text variable. For instance, a template may include a list of all defendants in a certain case. Rather than utilizing a REPEAT command to provide the location of the list, a simple Text variable is employed. The responses for these temporary Text variables are then set using computation to contain the list of repeated information at the beginning of the template before it is repeated.
The third technique achieves the same effect as the first two, but it tackles the issue of numerous REPEAT instructions differently than the second method. Rather than wrapping the entire template text in a REPEAT instruction, an INSERT instruction is provided at the conclusion of the template to insert another template if a fresh repetition is required. This template then inserts another for the subsequent repetition, and so forth. Because the additional pages are added using an INSERT instruction rather than a REPEAT command, there are no problems when other repeated information is included in the template.
To Replicate The Text Template In Its Entirety
- Ctrl+A to select the full template text, then click the REPEAT Field button. A dialog window labeled REPEAT Field displays.
- Select a dialog that is repeated and click OK. The fields REPEAT and END REPEAT are put into the template.
- Before the END REPEAT field, insert a page break (Ctrl+Enter).
- After highlighting the page break, click the IF Field button. The dialog window for the IF Field appears.
- Select IF Expression from the Field type group, then type the following script in the Expression box (where Repeat Dialog refers to the repeated dialog used in the REPEAT instruction): COUNTER <COUNT ( Repeat Dialog )
- Select OK. The IF and END IF conditions are added to the template.
Using Text Variables For Repeated Information To Repeat The Full Text Template
- Substitute temporary Text variables for repetitive information. For example, instead of using a REPEAT instruction to construct a list of defendants, use a variable such as «Defendant List» («REPEAT Defendants:a, b, and c»«Defendant Name»«END REPEAT»).
- Ctrl+A to select the full template text, then click the REPEAT Field button. A dialog window labeled REPEAT Field displays.
- Select a dialog that is repeated and click OK. The fields REPEAT and END REPEAT are put into the template.
- Before the END REPEAT field, insert a page break (Ctrl+Enter).
- After highlighting the page break, click the IF Field button. The dialog window for the IF Field appears.
- Select IF Expression from the Field type group, then type the following script in the Expression box (where Defendants is the name of the REPEAT instruction's repeated dialog): COUNTER< COUNT( Defendants )
- Select OK. The IF and END IF conditions are added to the template.
- Click the Variable Field button with the cursor in front of the REPEAT field. The dialog window for Variable Field appears.
- Create a new Computation variable that holds the temporary Text variables' values. For instance, the following script creates a list of defendants from a repeated dialog (Defendants) and saves that list as the value for a temporary Text variable (Defendant List):
""
REPEAT Defendants
FORMAT "a, b, and c"
RESULT + Defendant Name
END REPEAT
SET Defendant List TO RESULT
""
How Do I Import A Template Into Word?
Insert Templates Or Add-Ins
When you load a template or add-in, it is loaded only for the duration of the current Word session. When you exit and resume Word, the template or add-in is not reloaded automatically.
- Select File > Options > Add-Ins in Word 2010, 2013, or 2016.
Select Word Options > Add-ins in Word 2007 by clicking the Microsoft Office Button picture.
- Select Word Add-ins from the Manage list, and then click Go.
- Navigate to the Templates tab.
- Select the check box next to the template or add-in that you want to load under Global templates and add-ins.
If the desired template or add-in does not appear in the box, click Add, navigate to the folder containing the desired template or add-in, select it, and then click OK.
Remove Any Templates Or Add-Ins
It's a good idea to unload templates and add-in programs you don't use very often to save memory and speed up Word. When you unload a template or add-in from your Startup folder, Word removes it from the current Word session but immediately reloads it the next time you use Word. When you unload a template or add-in from another folder, it becomes inactive until you reload it. Remove the template or add-in from the Templates and Add-ins dialog box to delete it from Word.
- Select File > Options > Add-Ins in Word 2010, 2013, or 2016.
Select Word Options > Add-ins from the Microsoft Office Button icon in Word 2007.
- Select Word Add-ins from the Manage list, then click Go.
- Select the Templates option from the drop-down menu.
- Select one of the following options:
- Clear the check box next to the item's name to unload the template or add-in but keep it in Global templates and add-ins.
- To unload and remove a template or add-in from the Global templates and add-ins box, click the item in the box, then click Remove.
When unloading templates or add-ins, keep the following in mind:
- When you select a template from your Startup folder, the Remove button is disabled.
- Unloading a template or add-in does not delete it from your computer; it simply disables it. When you launch Word, the place where you saved the template or add-in decides whether it is loaded.
When You Launch Word, Make A Template Or Add-In Available
Store a template or add-in in the Startup folder to have it available anytime you open Word. To locate the startup folder's current location, use the following steps:
- Select File > Options > Advanced in Word 2010, 2013, or 2016.
Select Word Options > Advanced from the Microsoft Office Button icon in Word 2007.
- Click File Locations after scrolling down to General.
- Take note of the Startup location. Save the template or add-in to this location if you want it to be available when Word starts.
Where Is Template In Word?
Word 2016's goal is to make it easier for you to generate documents of the highest quality. Additionally, Word can assist you in organizing and writing documents more efficiently.
When you create a document in Word, you have the option of starting from scratch or letting a template take care of much of the work for you. From that point on, the fundamental methods for producing and sharing documents are identical. Additionally, Word's strong editing and reviewing facilities can assist you in collaborating with others to make your document outstanding.
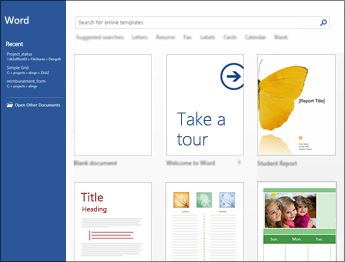
Create A New Document
Instead of starting with a blank page, it's often quicker to build a new document using a template. Word templates come with pre-installed themes and styles. All you have to do now is fill in the blanks with your material.
You can choose a template from the gallery, click a category to see additional templates, or search for more templates online every time you start Word.
Click any template to open a big previewfor a deeper look.
Click Blank document if you don't want to use a template.
Create A New Document
Your most recently used documents will appear in the left column of Word every time it is opened. If you are unable to locate the document you are looking for, click Open Other Documents.
If you're already in Word, select File > Open and then navigate to the location of the file.
When you open a document created in an older version of Word, the title bar of the document window displays Compatibility Mode. You have two options: continue working in compatibility mode or upgrade to Word 2016.
Document Saving
Do the following to save a document for the first time:
- Click Save As on the File tab.
- Navigate to the location where you want to save your document.
Note: To save the document to your computer, click Browse or select a folder under This PC. To store your document online, either select an internet site or click Add a Place under Save As. When your files are online, you may collaborate on them in real-time by sharing, providing input, and collaborating on them.

- Click Save.
Note: Note that Word stores file in the.docx format by default. To save your work in a format other than.docx, select the desired file format from the Save as type list.
Click Save in the Quick Access Toolbar to save your document as you work on it.
Read Documents
Turn on Read Mode for your document to conceal most buttons and tools so you can focus on what you're reading.
- Open the file that you wish to read.
Pro tip: Certain documents, like protected documents or attachments, open in Read Mode by default.
- Click View > Read Mode.
- To navigate between pages in a document, use one of the following methods:
- To navigate between pages, use the arrows on the left and right sides of the pages.
- On the keyboard, press page down and page up, or spacebar and backspace. Additionally, you can utilize your mouse's arrow buttons or scroll wheel.
- Swipe left or right with your finger if you're using a touch device.
Pro tip: Tip: Click View > Edit Document to edit the document again.
Keep Track Of Changes
When you're collaborating with others or updating a document on your own, turn on Track Changes to keep track of all changes. All additions, deletions, movements, and formatting changes are noted in Word.
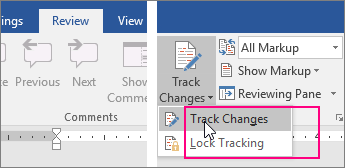
- Open the document that you wish to review.
- Select Track Changes by clicking Review and then on the Track Changes button.
Print Out Your Document
You can preview how your document will look when printed, configure your print options, then print the file all in one location.
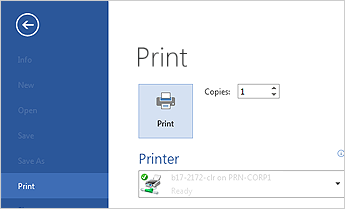
- On the File tab, click Print.
- Carry out the following:
- Enter the desired number of copies in the Copies box under Print.
- Ascertain that the desired printer is selected under Printer.
- The default print settings for your printer are pre-selected under Settings. To modify a setting, simply click the desired setting and then select a new one.
- When you're ready, click Print.
About The Authors

Steve MartinsI am a certified graphic designer and I earned my bachelor’s degree in Communication Design. I worked with many brands like Uniqlo and Huawei but also independent smaller Barcelonian brands like Caravelle and Madrid’s Hola Coffee and I have completed over 2000 projects in the last 5 years.